Host your GitLab robot for free on webstask.io

Some months ago, I blogged about my experience building GitLab robots, backed by webhooks and API, to implement behaviors that has been missing for you and your team in GitLab.
Today, I’ll share my thoughts and steps in building a Node.js GitLab robot infrastructure one can host for free (no kidding) on frictionless webstack.io platform. At the end of this post, I’ll assume you to have detailed insights in how you will bring new behaviors to your own GitLab instance (and/or GitLab.com), tailored right for your team and company needs.
What is Webtask?
Webtask.io is a service crafted by Auth0 Inc. to host your code. You have nothing to worry about: as soon as your code is pushed online as a webtask, it will automatically be run to answer every time you HTTP trigger its attached URL. Let’s try it together!
First login to webtask, and start a Docker container to keep your computer clean:
docker run -it --rm -w /webtask -v $(pwd):/webtask node:6 /bin/bash
From within the Docker container, install wt-cli and initialize it with the email you used to login to webtask:
npm install wt-cli -g
wt init your@email.com
You’ve just been sent an email with a verification code, simply paste it in your console. We are now ready to bootstrap an initial working webtask:
echo "module.exports = function (cb) {cb(null, 'Hello');}" > webtask-gitlab-robot.js
wt create webtask-gitlab-robot.js
Here is your first URL! Should look like https://wt-uniqueId.run.webtask.io/webtask-gitlab-robot. Feel free to trigger it instantly, for example with your browser or curl:
curl https://wt-uniqueId.run.webtask.io/webtask-gitlab-robot
# will print you "Hello"
That’s it! Have a look at webtask.io documentation, it comes with much more for you: authentication, storage, cron, logging… You just found your new supercharged serverless backend hosting service.
With @webtaskio, you've just found your new supercharged serverless backend hosting service! Tweet this
Listening to GitLab webhooks
Let’s leverage our webtask to integrate with your GitLab project. Head to the integrations page (something like https://gitlab.com/group-name/project-name/settings/integrations), paste your webtask URL, and type-in a Secret Token:

The Secret Token has nothing to do with Webtask, but we’ll be using it shortly in our webtask to ensure that we never run any code if not triggered by your GitLab project configured webhook. Be sure to uncheck all webhook triggers but Merge Request events for now, let the SSL verification on (as Webtask is running on HTTPS) and click on Add Webhook.
We will now start building our robot logic. Webtask comes with a handy online editor to avoid using CLI when appropriate. Get the link to this editor by issuing wt edit webtask-gitlab-robot in your Docker container, and open it in your browser. Then replace the initial source code of your webtask with this one:
module.exports = function(context, cb) {
  // checking if called by our GitLab configured webhook
  if (context.headers['x-gitlab-token'] !== 'type in your secret token here') {
    // will send an HTTP 400 response with this payload:
    // {"code"=>400, "error"=>"Script returned an error.", "details"=>"Unauthorized"}
    cb('Unauthorized', null);
  }

  // ensuring we are called for a merge request event
  if (context.data.object_kind === 'merge_request') {
    // reading data from GitLab webhook
    var source_branch = context.data.object_attributes.source_branch;
    var target_branch = context.data.object_attributes.target_branch;

    console.log('Got a merge request event from ' + source_branch + ' to ' + target_branch);

    // send an empty HTTP 200 response
    cb(null, null);
  } else {
    // we were not called for a known event
    cb('Unhandled event', null);
  }
}
How simple was that? We are now securely listening to GitLab webhooks, able to differentiate events, and to read data sent from GitLab for these events! As per the documentation, our webtask will be triggered when a new merge request was created, an existing merge request was updated/merged/closed or a commit is added in the source branch.
Typical scenario
Let’s assume this pretty common situation:
- you and your team are building stuff on feature branches, ie
adding-i18n-support,refactoring-modules… - there is a
stagingbranch you use to auto-deploy on your pre-production servers while triggering QA team for exhaustive review, - your
masterbranch is automatically deployed to production servers, - and you HAVE TO ensure that none of your code can get into production without getting in your
stagingbranch.
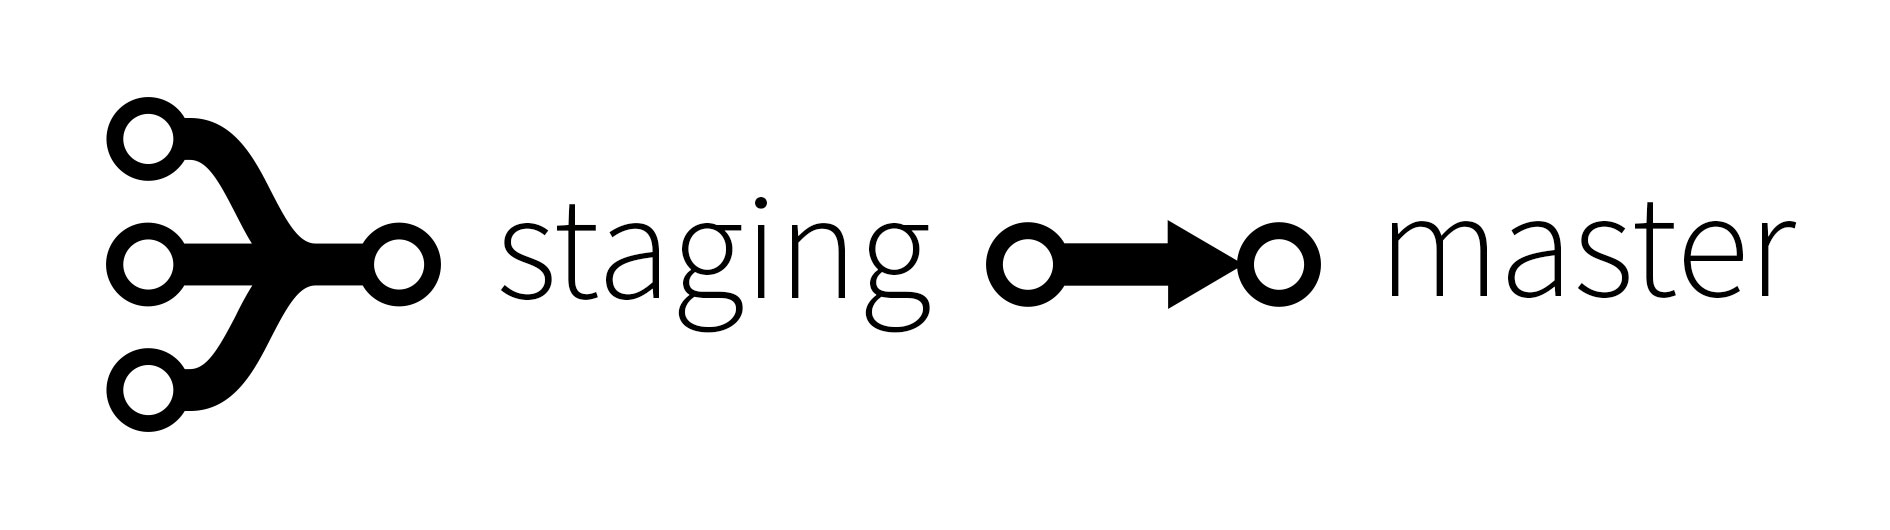
Protecting the master branch is not enough here: you won’t be able to push on it, but you’ll for sure be able to open and accept a merge request from a feature branch directly to the master production branch, without getting in the staging pre-production branch first. Depending on your GitLab user permissions, your could even directly push to the master branch… And we are all humans, we make errors (and learn from it). But you can’t afford it, because it’s breaking your branching strategy and company policies regarding Quality Assurance.
So you are to automate it! And, believe it or not, it’s pretty straightforward, as you just want to:
- avoid all users from pushing to the
masterbranch (lower your users permissions and protect that branch), - dismiss any merge request targetting
masterbranch which is not coming fromstagingsource branch.
When it comes to coding, it seems really obvious:
if (target_branch === 'master' && source_branch !== 'staging') {
  // close that heartbreaking merge request!
}
Interact with GitLab API
Here comes the interesting part, where we’ll be giving life to our robot. For now, it is simply listening to GitLab, through webhooks. Let’s rise up to the challenge and respond to these events through API!
To consume GitLab API, we need to be authenticated with Private Tokens or Personal Access Tokens. We will use the latter: head to your GitLab profile edit page, and click on the Access Tokens tab. GitLab.com user? Click here: https://gitlab.com/profile/personal_access_tokens. Type-in a name for this token, and check the api scope before clicking on Create Personal Access Token:
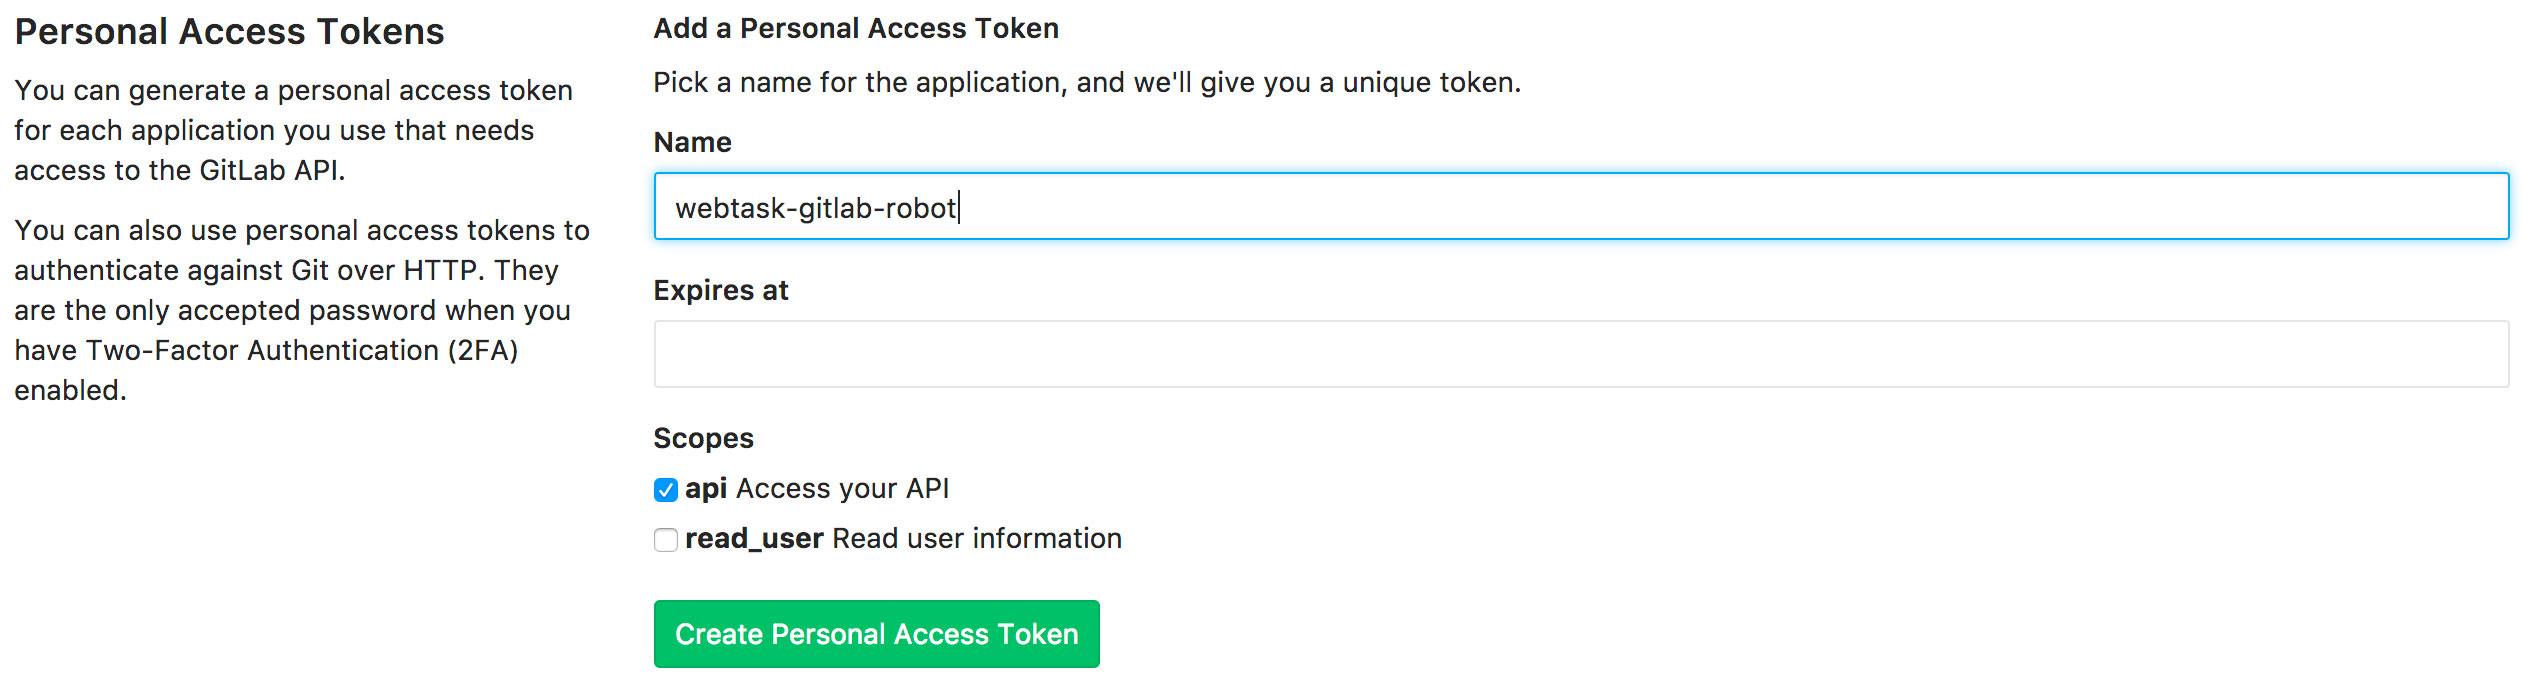
Be sure to copy the issued token, as you won’t be able to access it again.
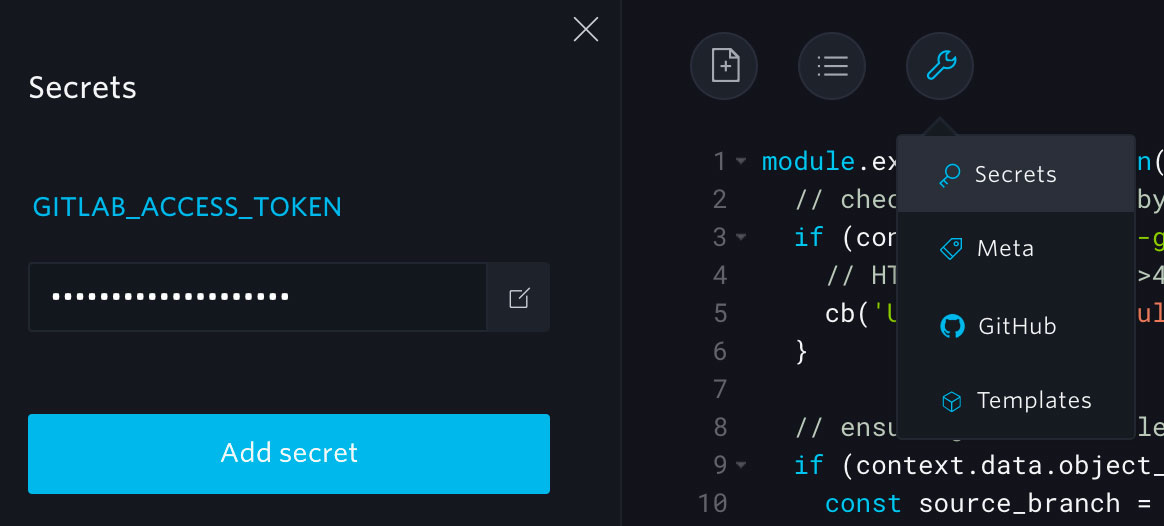
Back on the Webtask Editor, click on Tools > Secrets to embed the newly generated GitLab Personal Access Token to our webtask. Name the secret GITLAB_ACCESS_TOKEN and paste token as its value.
Without having hardcoded any token in our webtask, we are now able to authenticate on GitLab API using context.data.GITLAB_ACCESS_TOKEN. Let’s use the request package by requiring it on top of our webtask. Consuming GitLab API, in the context of securing our branching strategy, is now as easy as:
var request = require('request');
// helper function
function GitLabAPI(method, uri, body) {
request({
method: method,
url: 'https://gitlab.com/api/v3' + uri,
headers: {
'PRIVATE-TOKEN': context.data.GITLAB_ACCESS_TOKEN
},
json: true,
body: body
});
}
module.exports = function(context, cb) {
...
// illegitimate merge request detection
if (target_branch === 'master' && source_branch !== 'staging') {
var project_id = context.data.object_attributes.target_project_id;
var mr_id = context.data.object_attributes.id;
var state = context.data.object_attributes.state;
// automatically closing this illegitimate MR
GitLabAPI('PUT', '/projects/' + project_id + '/merge_requests/' + mr_id, { state_event: 'close' });
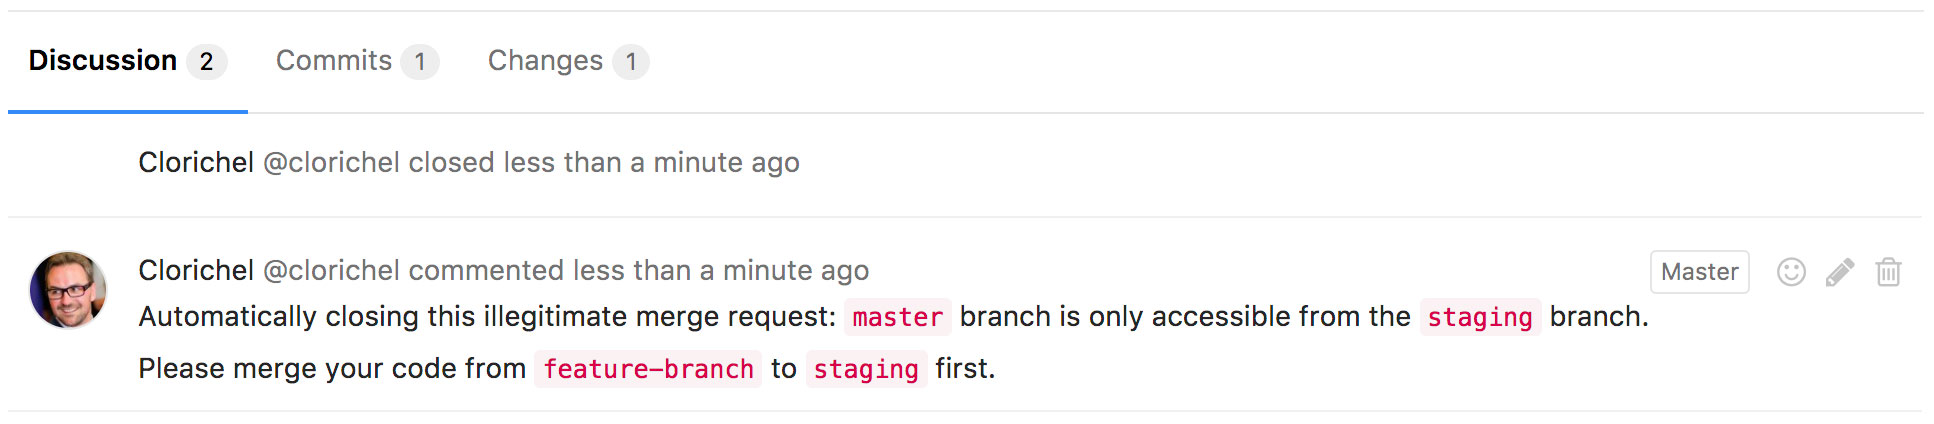
// adding a user-friendly comment if MR has just been opened
if (state === 'opened') {
GitLabAPI(
'POST',
'/projects/' + project_id + '/merge_requests/' + mr_id + '/notes',
{
body: 'Automatically closing this illegitimate merge request: `master` branch is only accessible from the `staging` branch.\n\nPlease merge your code from `' + source_branch + '` to `staging` first.'
}
);
}
}
And we got it done!
What’s next?
Your GitLab robot now both listens and speaks to GitLab, they are having conversations, and you are free to implement any automated behavior that was missing for you.
You will soon realize that your robot is talking to your users through comments on merge requests and issues, so I first encourage you to create a new GitLab account for it (simply use this account Personal Access Token where appropriate). Have some fun choosing it an avatar :)
Just made @gitlab alive: it's having conversations with my @nodejs robot hosted on @webtask! Tweet this
Then, the only limits are GitLab webhooks, API, and your imagination! Instant teasing on what you could build: add [WIP] to the title of a merge request when its pipeline failed, attach some labels to a newly created issue depending on keywords read in its description, ping some users when a specific label is added to an issue… I bet on you soon thinking you’ve made GitLab alive!
Need more help building your GitLab robot? Want to share its nerdy nickname and avatar?
I would love to get your feedback! Get in touch right now by email.
- webstack.io: https://webstack.io/
- Documentation: https://webtask.io/docs
- GitLab: https://about.gitlab.com/
- Webhooks documentation: https://gitlab.com/help/user/project/integrations/webhooks.md
- API documentation: https://gitlab.com/help/api/README.md
Robot logo derived from a Creative Stall creation CC licensed, webtask.io logo courtesy of Auth0, CC licensed logo from GitLab.